


Adding translated subtitles to a video used to mean either paying a professional or spending hours in a subtitle editor. Neither is necessary anymore. Between YouTube's built-in tools, free desktop software, and AI-powered online platforms, most creators can add accurate translated subtitles in under 30 minutes even for languages they don't speak.
This guide covers every practical method, from the quickest free options to professional workflows, with step-by-step instructions for each. Start with the decision guide below to find the right method for your situation, then jump to that section.
Which Method Is Right for You?
The best approach depends on where your video is going, how much control you need over the output, and whether you're optimizing for speed or quality. Use this table as your starting point:
Method 1: YouTube's Built-In Auto-Translate
If you're uploading to YouTube and just need viewers to toggle subtitles in their preferred language, this is the fastest path. YouTube auto-translates your captions into 100+ languages once you enable the original language captions—no external tools required.
Step 1: Enable Auto-Captioning
After uploading, go to YouTube Studio → Content → select your video → Subtitles. If auto-generated captions are available (YouTube creates them for most English videos within a few minutes of upload), you'll see them listed.
Step 2: Add Your Target Language
Click Add Language and select the language you want. YouTube auto-translates from your original captions.
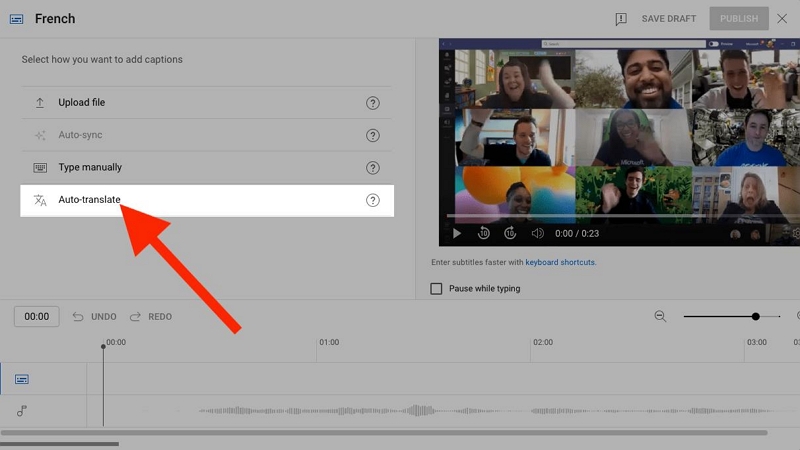
Step 3: Review and Publish
Translation quality varies by language. Spanish, French, German, Japanese, and Korean tend to be accurate. Less common languages are less reliable. Before publishing, click into the generated subtitles and review for errors, pay particular attention to proper nouns, brand names, and technical terminology.
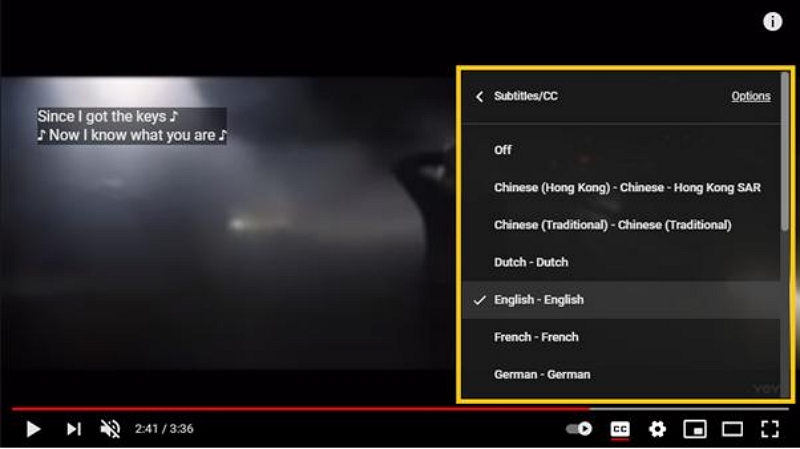
Limitations to know: Viewers must manually enable subtitles and select their language. You can't control subtitle appearance (font, size, position), and you can't export the translated subtitle file for use elsewhere.
Method 2: Mediaio Video Translator (Recommended for Most Creators)
For creators who want accurate, publishable subtitles without managing subtitle files manually, Mediaio Video Translator handles transcription, translation, review, and export in a single platform. It's the most practical option if you're translating videos regularly or working across multiple languages.
Step-by-Step: Translating a Video with Mediaio
Go to the Mediaio Video Translator page and upload your video file. Supported formats include MP4, MOV, and AVI.
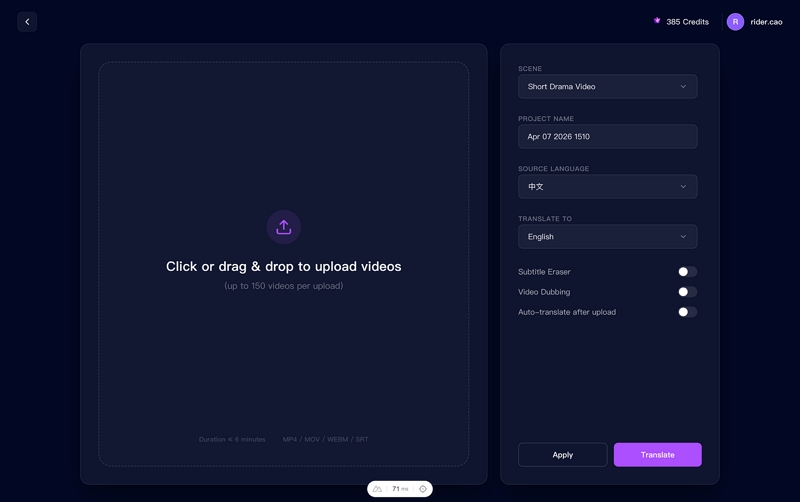
Enter a project name and choose your target language. Optional features you can enable at this stage:
Voice dubbing: generate translated audio alongside the subtitles.
Subtitle removal: strip any hardcoded subtitles from the source video before processing
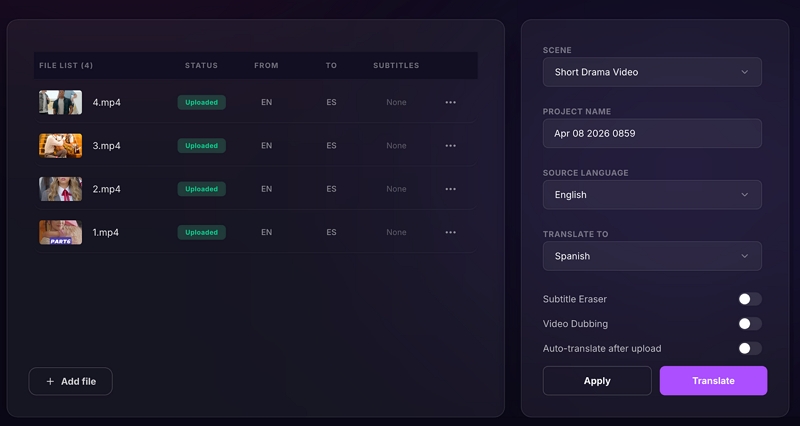
Once processing is complete, Mediaio opens an inline editing interface where you can review every subtitle line before export. This is where you catch the mistakes AI translation predictably makes: proper nouns, technical terms, and unnatural phrasing. For a 10-minute video, a review pass typically takes 10–15 minutes.
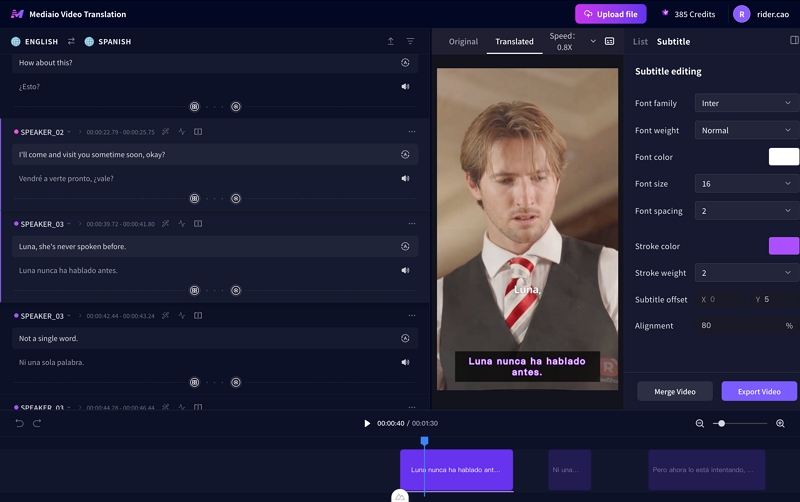
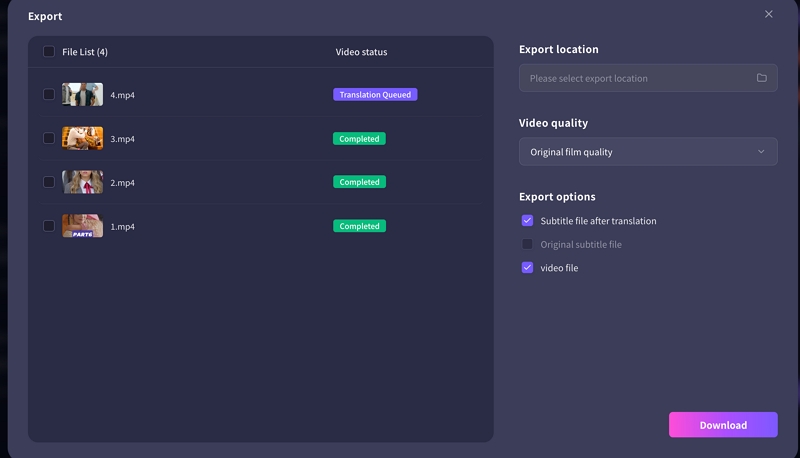
Click Download to export the translated video or subtitle file in your preferred format. For YouTube, download the .srt file and upload it via YouTube Studio → Subtitles → Add language → Upload file. This replaces the less accurate auto-generated captions with your reviewed translation, and signals to YouTube's algorithm that your video has complete caption data—which can improve search visibility across language markets.
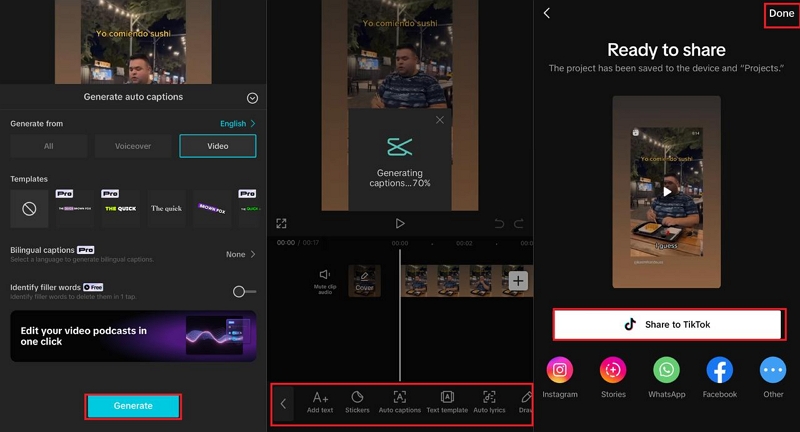
Method 3: CapCut (Best for Short-Form Social Videos)
CapCut works well for short videos destined for TikTok, Instagram Reels, or YouTube Shorts. It handles transcription, translation, and subtitle styling in one interface, no separate tools or file management needed.
Note on pricing: CapCut's auto caption and translation features are behind a paid subscription after a 7-day free trial. The trial is enough to evaluate whether it fits your workflow before committing.
Step 1: Import Your Video
Open CapCut (the desktop version gives you more control) and import your video file.
Step 2: Generate Captions
Click the Text tab at the top, then select Auto Captions. Choose your video's source language and click Generate. CapCut transcribes the audio and adds timed caption boxes to your timeline.
Step 3: Review and Edit Captions
Check the generated captions for errors, particularly names, slang, and fast speech. Click any caption box to edit the text directly.
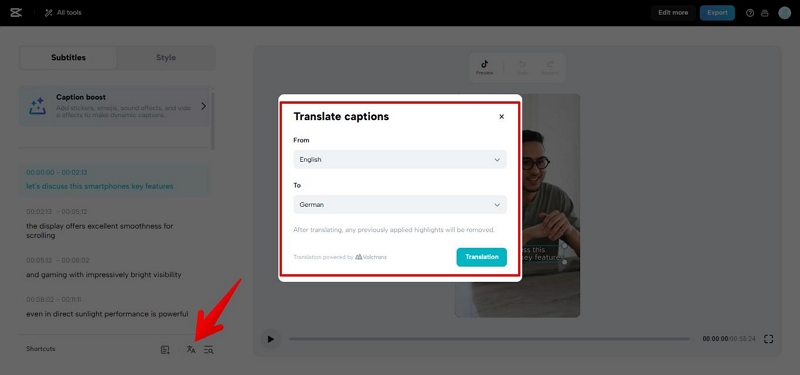
Step 4: Translate
With your captions selected, go to the caption editing panel and choose Translate. Select your target language. CapCut replaces the original text with translated versions while keeping the timing intact.
Step 5: Style Your Subtitles
Go to the Styles menu to adjust font, size, color, and position. For social video, bold white text with a slight shadow or outline reads best across different backgrounds.
Limitations: Monthly usage caps apply on the paid plan. Output is optimized for social formats, not cinematic productions.
Method 4: Subtitle Edit + DeepL (Best Free Option for Full Control)
This combination gives you professional-quality results for free. Subtitle Edit handles transcription and timing; DeepL handles translation. Both have free tiers sufficient for most projects. The tradeoff is more manual steps compared to an all-in-one platform.
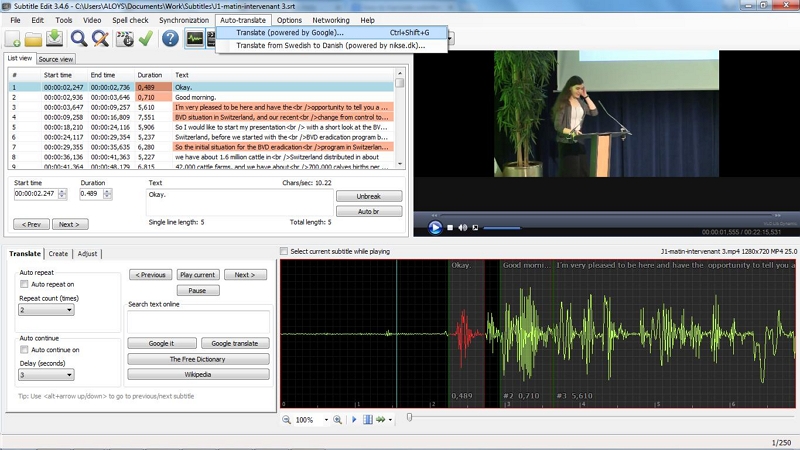
Step 1: Generate Subtitles in Subtitle Edit
Download and open Subtitle Edit (free, Windows). Go to Video → Open to load your video. Then go to Video → Audio to Text, select your source language, choose the Large language model for best accuracy, and click Generate. Subtitle Edit uses Whisper under the hood, which handles accented speech and background noise well.
Step 2: Review and Correct the Transcription
Switch to List View to see all subtitle entries. Correct any errors before translating, fixing mistakes at this stage is faster than correcting them after translation, when you may not be able to easily verify the source text.
Step 3: Translate
Go to Tools → Auto Translate. Select DeepL (requires a free API key from deepl.com, best quality for European languages) or Google Translate (no key needed, better coverage for Asian and African languages). Select your target language and click Translate All. Subtitle Edit sends each line to the translation API and replaces the text while preserving all timing codes.
Step 4: Review Translated Subtitles
Watch the video with the translated subtitles playing. Focus on lines that seem unnaturally short or long relative to the speech, any untranslated text (common with mixed-language content), and technical terms or brand names that may have been translated literally.
Step 5: Export
Go to File → Save As and choose your format. SRT works universally for YouTube upload. VTT is preferred for web video players. To burn subtitles permanently into the video, go to Video → Generate video with burned-in subtitle.
Limitations: Windows only for full functionality. Large language model transcription can be slow on older hardware without a GPU.
Method 5: DaVinci Resolve (Best If You're Already Editing There)
DaVinci Resolve 18 and later includes built-in transcription and subtitle generation. If you're already editing your video in Resolve, this keeps the entire workflow in one application—no need to export and reimport subtitle files mid-project.
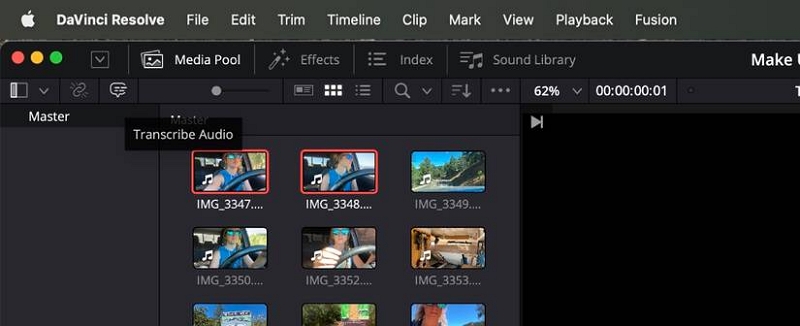
Step 1: Transcribe Your Audio
In the Cut or Edit page, right-click your clip in the timeline and select Transcribe Audio. DaVinci generates a transcript synced to your timeline.
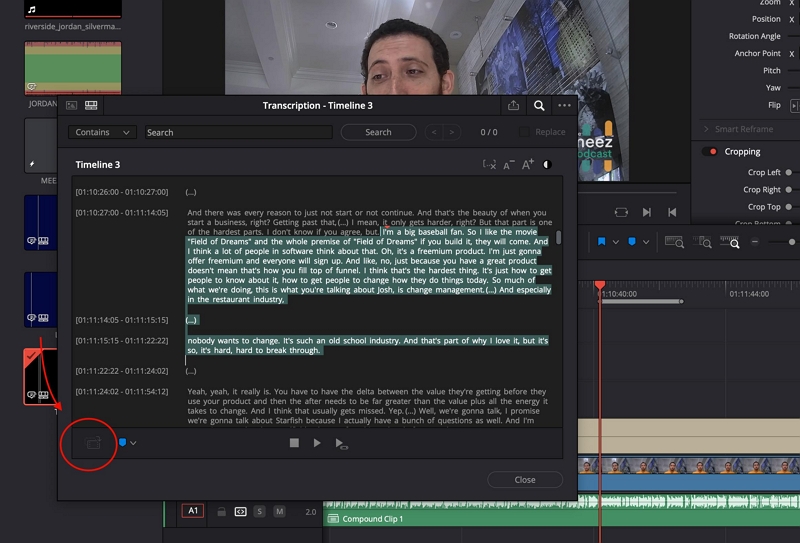
Step 2: Convert Transcript to Subtitles
In the transcript panel, select all text and click Create Subtitles from Transcript. DaVinci generates timed subtitle clips on a dedicated subtitle track.
Step 3: Translate
DaVinci Resolve doesn't have built-in translation. Export your subtitles as an SRT file (File → Export Subtitles), translate using DeepL or Google Translate, then reimport the translated SRT back into your project.
Step 4: Style and Export
Click any subtitle clip to adjust font, size, and position in the Inspector panel. On the Deliver page, enable Burn Subtitles Into Video if you want hard subtitles, or export the SRT separately for soft subtitles.
Note on a common export issue: Set your timeline start point to 00:00:00:00 before exporting subtitles. Timelines starting at 01:00:00:00 (a common broadcast convention) produce SRT files with offset timestamps that appear out of sync when imported elsewhere.
Getting Better Translation Quality
AI translation produces a usable first draft but rarely a finished product. These practices consistently improve output quality regardless of which tool you're using:
Start with clean audio. Transcription accuracy directly determines translation quality, errors in the transcript become errors in the translation. Record in a quiet environment, use a directional microphone where possible, and apply basic noise reduction before processing if your recording has background noise.
Edit the transcription before translating. Most tools let you review the source language transcript before running translation. Fixing errors at this stage is faster than correcting them after translation, when you may not be able to verify the source text.
Watch for idioms and cultural references. "Break a leg," "it's raining cats and dogs," and similar expressions translate literally into nonsense in most languages. Review any translated line that corresponds to an idiomatic source phrase and rewrite it to convey the intended meaning rather than the literal words.
Know when to use human translation. AI handles straightforward, clear speech well. It struggles with heavy accents, overlapping speakers, niche technical jargon, and anything where nuance matters, legal content, medical information, creative writing with wordplay. If AI is generating more errors than it's saving you time, a professional translator is the faster path.
Subtitle File Formats: Which One to Use
Choosing the wrong format is a common source of compatibility problems. Here's what each format is actually for:
SRT (SubRip Text) stores text and timestamps only, with no styling. It's the most universally compatible format, YouTube, Vimeo, most video players, and virtually every editing tool accepts it. Use SRT as your default unless you have a specific reason not to.
VTT (WebVTT) adds basic styling support (font, color, position) and is optimized for web video players. Required for some HTML5 video implementations. YouTube also accepts VTT. If you're embedding video on a website, VTT is often the better choice.
ASS/SSA supports complex styling including per-character animations, custom fonts, and precise positioning. Primarily used in productions where visual subtitle design is part of the creative work. Overkill for most business or educational content.
Quick reference: For YouTube, use SRT or VTT, both upload cleanly. For web embedding, prefer VTT. For burning subtitles into video, the format doesn't matter since the subtitles are rendered directly into the video pixels.
Technical Tips for Better Subtitles
Timing: Place subtitle start times 2–3 frames before the audio begins. This slight anticipation makes subtitles feel more synchronized because reading starts slightly before the word is heard.
Reading speed: Aim for no more than 17 characters per second. Long lines at short durations force viewers to choose between reading and watching.
Line breaks: When a subtitle needs two lines, break at a natural speech pause rather than at the character limit. "I went to the store / and bought milk" reads better than "I went to the store and / bought milk."
Color and contrast: White text with a thin black outline or drop shadow is readable against virtually any background. Avoid yellow unless the video has a lot of white backgrounds. Never use colored text for translated subtitles—it reads as lower quality.
Entering subtitles manually in YouTube Studio: Press Shift+Space to pause the video while typing. Enable Pause when typing in the settings to keep the video paused as long as you're actively entering text.
Troubleshooting Common Problems
Subtitles are out of sync. First, try regenerating, timing errors sometimes resolve on a second transcription pass. If the problem persists, check for a frame rate mismatch (for example, subtitles generated for 25fps applied to a 29.97fps video). Most subtitle editors have a Synchronize or Adjust Timing function that lets you shift all subtitles forward or backward by a fixed amount.
Translation is inaccurate on specific lines. Paste the problematic subtitle text into DeepL or an AI tool with context: "Translate this to [language]. It's from a about [topic]. The speaker is addressing [audience]." Context-aware translation consistently outperforms sentence-by-sentence machine translation.
Subtitles won't upload to YouTube. Check the file encoding, YouTube requires UTF-8. Open the SRT file in a text editor and save with UTF-8 encoding (in Notepad: Save As → Encoding → UTF-8). Also check for empty subtitle entries, which some tools generate and which YouTube sometimes rejects.
FAQ
You can create subtitle files for personal use. Distributing modified versions of copyrighted videos with added subtitles requires permission from the rights holder in most jurisdictions.
Properly rendered hard subtitles don't degrade video quality—they become part of the video pixels at whatever resolution you export. The risk is exporting at too low a bitrate, which causes the sharp edges of subtitle text to appear blocky.
For European languages, Subtitle Edit connected to the DeepL free API gives the best results. For Asian languages and broader coverage, Google Translate integration in Subtitle Edit is more reliable for less common language pairs. For an all-in-one workflow without file management, Mediaio Video Translator is the strongest free-to-start option.
For online tools like Mediaio, typically 1–3 minutes per 10 minutes of video. Desktop tools using Whisper depend on your hardware—a modern GPU processes roughly in real time; CPU-only processing takes 3–5x longer.
Soft subtitles (separate file, viewer can toggle on or off) are the right choice for YouTube, streaming platforms, and anywhere viewers might want to disable them. Hard subtitles (burned in) are better for social media clips where autoplay without sound is common, or for platforms that don't support external subtitle files.
Summary
Most creators will get the best results from one of two paths: YouTube's built-in auto-translate for a quick, zero-effort starting point, or Mediaio Video Translator for accurate, publishable subtitles without the overhead of managing files manually. For creators who want free offline control, Subtitle Edit paired with DeepL produces professional-quality output at no cost, it just requires more steps.
Whichever method you use, the same principle applies: fix errors at the source before translating, do a review pass after, and upload your own subtitle files rather than relying on auto-generated captions. That combination produces subtitles that are accurate enough to expand your reach, and complete enough for YouTube to index your content across language markets.